

 Use the PowerPoint lesson in your class as direct instruction. Have students take notes and try problems, however it is that works most efficiently in your classroom.
For me, this often works best when I use a combination of the PowerPoint and a document camera, smart-board, or white board. Often, I will stop when I think students need an opportunity to try what they have learned so far. This is where the art of teaching comes in. So, stop periodically, ask questions, have students try questions, write some on the board, encourage students to come to the board and try, or whatever method you use frequently.
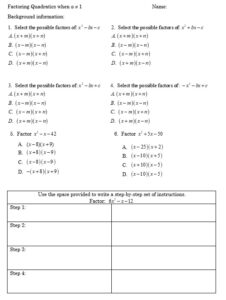
The student hand-out has some questions that force students to address the potential confusion points in prerequisite knowledge and ability. After those 6 questions there is a place for students to compress and summarize their notes into a quick reference guide.
The second page of the hand-out contains just seven questions. The homework assignment is an appropriate length for students learning something new. Explain to them that the idea behind having just seven questions is that students should have time to patiently try what they’re learning and not feel overwhelmed by having to answer 30 questions.
The efficiency and speed can come AFTER students really learn the ins-and-outs of the process.

The Google Forms Quiz can be used in three ways. If students are particularly quick, use it as an exit-ticket. It can also be used in place of the handout as homework. Personally, I have used this as a bellwork quiz the day after, or the second day after, the lesson.
The quiz is short, 8 total questions, but can be adjusted and customized. The reason it is just eight questions is to keep the time in class short. This is a 10 minute check-up to inform you and students where they are and how they’re doing.
You will need a Google Drive to use this quiz. When you click the link you will be taken to a screen that will have you create a copy of the Google Forms Quiz in your Google Drive.
From here you can assign this assessment via Google Classroom.
