On Teaching Math Header and logo

How to Introduce Quadratics to Algebra 1?

The Big Ideas, Goals, and Details

I’ve tried all varieties of introducing the topic of quadratic equations to Algebra 1 students and have found that going slow early on is the best practice.  For the first lesson, which can take 2 to 4 days, depending on your students and class time, I’d suggest focusing on a few key concepts.  By the end of the section students should be able to answer these questions.

  1. What is a graph?
  2. How can I find the value of y if I know the value of x?
  3. What makes an equation quadratic?
  4. What is a parabola?
  5. What are the parts of a parabola?
  6. Why is the vertex so important?
 

By the end of the unit the students should be able to do the following.

  1. Fill out a t-chart for a quadratic equation.
  2. Read function notation and understand what f(2) means.
  3. Plot the points to make a parabola on an x-y coordinate plane.
  4. Identify and label the following points of a parabola,
    1. Vertex
    2. y-intercept
    3. x-intercept(s).
 

Along with taking time early on to develop that foundational conceptual understanding, there are three things that I’d suggest incorporating into the first lesson(s).

  1. Guided Notes
  2. Lots of Practice
  3. A Formative Assessment

Here is a video of this lesson that I share via Google Classroom with students.

How to Parse This Lesson Out

That seems like a lot to do to introduce a topic.  However, it is a huge topic and a significant jump in complexity from linear equations, which is likely the last things they graphed in Algebra 1.  However, through some collaboration, group practice, and independent practice, the goals of this lesson are very attainable.  Let’s dive into an approach.

Day 1 – Teacher Led Explorations

I created a slide for my lessons, shown in Figure 1.  It starts the lesson with a conceptual question and some timed collaboration like “think-pair-share,” or whatever other method you like to use to get kids talking together.

There is a GIF of a one-minute timer in the slide, which starts automatically.  For some reason this little addition really gets kids moving!  There’s some urgency they act upon in response to the timer. 

The question itself is a bit of a trick … none of the options are quite right.  This really captures the attention of the students so that you can drive home the idea that a graph is a visual representation of all of the order pairs of a function (in our context).  In other words, in kid-speak, a picture of all of the answers.

For my lesson, I create guided notes that are designed to work hand-in-hand with the PowerPoint.  There’s a spot right on top of the notes for students to write their learning from this little introductory discussion about what graphs are.  You can see this in Figure 2.

I take this opportunity to have students notice the layout of the guided notes and teach them to read ahead so they can anticipate what’s coming next in the lesson.  This is a great practice for students who learn math faster than the average student, but also helps those who are nervous stay grounded.  They can see what’s coming.

The stage is set for talking about inputs and outputs, order pairs, function notation, and the parts of a parabola.  In addition to those things, it’s a great time to help students learn to read a graph with questions like:

  • What is the input value that produced -4?
  • What was the output value when x = 3?


Some of these questions are in the guided notes I created, but some are not.  If you’re creating your own, add as much, or as little as you like.  However, through varied questioning, students gain exposure to some key concepts that will be deeply explored later in the unit.  There’s no need to do an exhaustive, deep-dive into anything in the introductory lesson.  We want students to come away with a quality experience that has exposed them to quadratic equations.

With that idea in mind, before students are 100% on top of everything it can be a great idea to switch up the approach.  Instead of looking at a graph and identifying the parts and playing with what is an input and an output and how they’re matched up, let’s start graphing with a t-chart.

I like to push the lesson forward with questions.  I try to recreate or anticipate questions students will have.  So, instead of a learning objective I share with students, I share their questions.  To transition to the next part I use this slide, shown in Figure 3.

Also notice in Figure 3, where a notice that we have changed pages in the guided notes is posted.  Even when kids are paying attention it can be hard to keep track of exactly where they are in the lesson.  They’re juggling a lot of new information. I’d rather them focus on the math, so telling them to change the page is a small concession that’s worth it!

In my experience, there’s enough time for only one example with the t-chart.  So for homework on day 1, I just give them two more t-charts to fill out and graphs to make. 

A few notes about the examples.

  1. Pick the equations carefully so they’ll easily fit on the graph.
  2. Choose the x-values so that students will find the intercepts and vertex.
  3. Provide a place for them to write their work because they’ll refer to their work the next day … they will forget!

In Figure 4, you can see the remaining two problems that will be assigned as homework for day 1 of this introductory lesson.  You can see there are some conceptual questions at the bottom of each graph that has them compare one graph to the next, so they can begin to anticipate what the different values of a, b, and c, do to the quadratic equation.

Day 2 - Student Driven

Day 2:  This is a structured workday, so charge up your timer!  I use a large timer with a magnetic back.  I got it on Amazon for around $30.

One of the things we often do as teachers is become too focused on a particular task, and students follow our lead.  This is partly why they “memory dump,” old topics once we’ve moved on.  With that in mind, it’s a great idea to begin day 2 with some Bellwork that revisits old topics.

I use an ACT set of questions, just three, one minute each, one at a time.  I select appropriate Algebra 1 questions from the ACT Mathematics Guide, which I also purchased on Amazon for about $15.  You can see an example of one of these Bellwork (and download it for free) here.

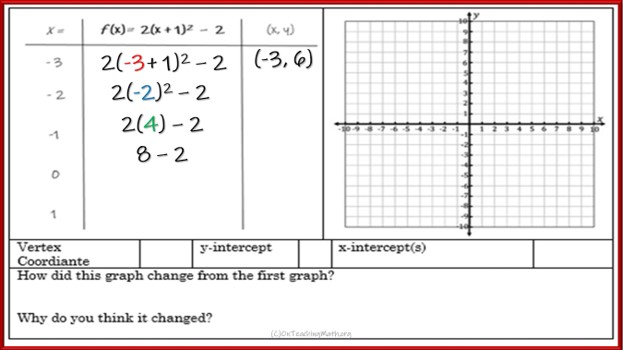
Introduce Challenges:  Once those questions are explored and discussed I hand out copies of the work for the day.  There are four questions, set up exactly as it was in the guided notes from Day 1.  The first two questions are fairly easy, but a bit harder than what was done previously.  The last two questions are trickier, with the last being a quadratic equation written in Vertex Form (as shown in Figure 5.)

I give students 10 minutes to complete the first question.  At the end of the 10 minutes, we review the question, step-by-step.  This kind of support is appropriate early on.  It is always surprising what students misunderstand.  Doing this type of exercise can provide you with a lot of information from an informal setting.

To wrap the day up, I give students a homework assignment.  It’s not overly complex procedurally, but forces students to think. The thing they don’t know is that the quiz on Day 3 is a Google Forms version of their homework.

You can see the first two of the three pages in Figure 6.

Day 3 - Check for Understanding

Day 3:  To begin the day, review the homework.  Have students share answers, work on the board, and ask questions.  It can be a great time to offer students additional practice if it becomes apparent that something isn’t going well.

When the review is completed, I collect the work, even though this is not my normal practice.  I want to drive home the point that to be successful, authentic work must be completed.  Those that copied, or didn’t do their homework will not be rewarded with artificial access to the answers on the quiz.  Only those that are working diligently and working to learn will find the quiz easy.

Note:  I do not, at any point, tell the students that the quiz is the same as the homework.  Word gets out fast and I don’t want students later in the day trying to memorize the answers.  Of course, many students will know what has happened and tell their friends, but at least I’ll have done my part!

The Formal Assessment: Writing a Google Forms assessment can be tricky in math.  Students answer with varied answers, like X instead of x, or -3 instead of – 3.  Google doesn’t pick up on the nuance and it can be exhaustive trying to capture all variations in the answer key.  I like to use the following multiple-choice grid-type questions, as shown in Figure 7, to help with this.  It keeps kids from just guessing, like they do with normal multiple-choice, and makes them think carefully.

If you’d like to try the quiz yourself, you can do so here.

Wrap - Up

I’ve been teaching high school level math for 2 decades and spent 10 years teaching night classes at a community college.  I’ve tried nearly every variation of teaching quadratic equations, but found this approach to be the best. 

I hope these thoughts help you and your students.  If you have questions, I’d love to hear them.  Maybe I can help. 

If you’d like to use the resources I have created for this lesson, you can do so by using the links below.  However, there’s plenty of free stuff posted here and a lot of ideas to get you started.  Give it a shot, let me know how it goes!

Lesson, Notes, Practice

Assessment, Paper & Google Forms